Meta:Manual of Style/Fate Episodes
Fate Episodes are archived on the wiki after converting the fate episode's json into a wiki-usable format. This page provides steps for converting json data using Meta:FateConversion.
For a full list of fate episodes already archived on the wiki, see Fate Episodes.
Pre-requisites
- These steps assume you are using Google Chrome.
- Fate episode jsons must be obtained through Lyria's Field Notes. Do not use jsons from the Fate Episode page.
- This means you must complete the entire fate episode and obtain the reward first.
- Your main character's name must not be a word used in dialogue text, such as "You", "the", "where", a recruitable character's name, etc. Cutscene jsons automatically fill in your main character's name and these are replaced with (Captain) during the conversion.
- If your name is a word potentially used in dialogue, then either change your name to something unique or refrain from submitting fate episodes altogether.
- Check your Chrome Developer mode settings by pressing Ctrl+Shift+I. Make sure Network is selected. Then make sure XHR is selected.
- Only registered accounts at least 24 hours old may create a new page on the wiki. This includes fate episode pages.
Steps
- Open Meta:FateConversion in a separate tab/window.
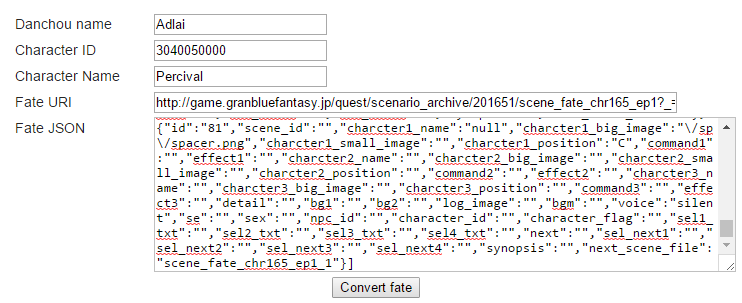
- Enter your main character's name in the Danchou name field
- Then enter the name of the character you're getting fate episodes from. Do not include the variant identifier that the wiki uses such as (SR) and (Event). Only use the base name.
- If it is a Cross-Fate, both characters should be input "NameA and NameB". Order of the names in alphabetical order if possible.
- Using Google Chrome while logged into your account, go to Lyria's Journal, select the "Characters" section, and select the character with the fate episode you will convert. You should now be in the character Field Notes page.
- In Meta:FateConversion, enter the Character ID number into the Character ID field.
- The Character ID can be found be looking at the URL of the character's Field Notes page. It is a 10-digit number that starts with 3. Do not mix this ID number up with your user ID which is also in the URL.
- If it is a Cross-Fate, then both character IDs should be included separated by a comma.
- The Character ID can also be found on the character's wiki page found under "Extra Data" below the character template.
- In the game on the character's journal page, scroll down to find large buttons for viewing the character's fate episodes.
- Before viewing the fate episode, open Google Chrome's Developer mode by pressing Ctrl+Shift+I.
- While the developer mode window is open, click a fate episode in the game.
- The developer window should populate a list files which looks like this:
- Select the file that starts with scene_fate_chr or a name that's similar.
- Select the Preview tab. If the contents of the preview tab looks like the following image, then you selected the correct json.
- This is an optional step, but it's a very easy way to determine you selected the correct json.
- Right-click the name of the scene_fate_chr json, highlight Copy, then click Copy Link Address.
- Paste json link into the Fate URI field in the Meta:FateConversion page.
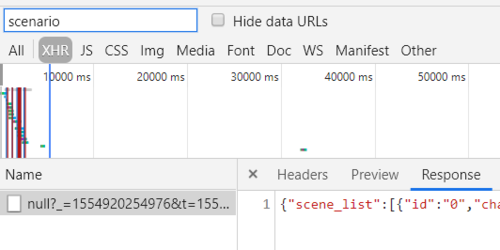
- Select the Response tab. The contents of the window should now look like this:
- Click the inner-window below the response tab, then press Ctrl+A (Select All) to highlight the contents of the tab. Then press Ctrl+C to copy the json.
- Open your Meta:FateConversion tab/window and paste the json in the Fate JSON box in Meta:FateConversion. At this point, all fields should be filled in.
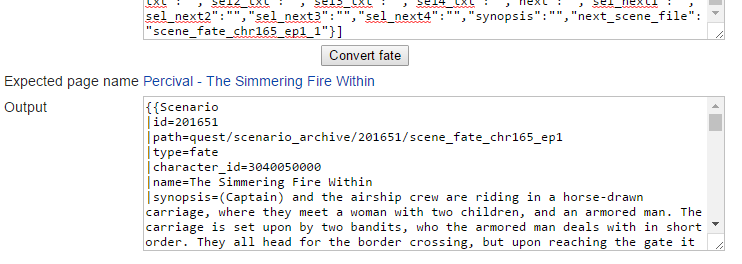
- Click the Convert Fate button. If there are no error pop-ups, you did the process correctly.
- Copy the contents of the output. Click the link labeled Expected page name which is right below the Convert fate button. This is the page that you will paste in the output.
- Click the Create tab at the top of the wiki page.
- Paste the output into the text editor.
- Click Save Page.
- Highly advised that you review the output.
If a fate episode has multiple scenes
- If there are multiple scenes, you have more steps to take!
- You do not need to manually view the entirety of a fate episode. A single scene is fully contained within a single json.
- In the game, while the Developer Tools window is open, click the Skip button to move to the next scene.
- Repeat Step 11, but you must instead find a cutscene json which might be named differently.
- Cutscenes with multiple scenes are pasted onto the same page sequentially below one another.
If a fate episode has variants depending on characters

Some fates vary based on what members you've recruited. These need some extra manual work to piece together. If you do not have all characters available for all possible scenario variants, please refrain from archiving that fate episode. We need all possible variants for accurate archiving on the wiki.
- Run all the different variants of a Fate and convert them as instructed above. Save the texts in a text editor.
- Use a diff tool to compare the different versions. What you're looking for are ScenarioStep IDs that are missing between fate versions.
- Create a master fate document where you copy all ScenarioStep IDs (in order) and tag them using the step_flag field:
- The step_flag field basic syntax is
- |step_flag=lack,id;have,id
- If a character is missing:
- |step_flag=lack,3040019000
- If a character is needed:
- |step_flag=have,3040019000
- If any version of a character is fine then use:
- |step_flag=haveany,3040019000
- The opposite version of haveany is lackany:
- |step_flag=lackany,3040019000
- If Captain gender matters:
- |step_flag=mc,m
- |step_flag=mc,f
- Some combination of them
- |step_flag=mc,f;have,3040019000;lack,3040017000;haveany,3040018000
- In the end you should have a fate with all ScenarioSteps in a numerical sequence.
See Scenario:Arulumaya - The Ultimate Referee for an example.
Other stuff
- If you run into any issues or need any help, please contact one of the wiki admins.
- For a complete example of proper fate output, see Vaseraga/Lore#Fate Episodes.
- See Meta:Manual of Style/Character Pages/Lore#Fate Episodes for where and how fate episodes are used on the wiki.
Event Story Archiving
Adding story event episodes to the wiki generally follows the same steps as fate episodes with some notable differences.
- Story event jsons must be obtained through Lyria's Field Notes. Do not use jsons from the ongoing event page.
- Since Meta:FateConversion requires the Character ID and Character Name fields to be filled, any ID and name can be used as input.
- Story event jsons may not start with scene_fate_chr. To easily find the correct json, type scenario in the filter in developer tools.
Changing the Output
After clicking Convert Fate, the output should look like the screenshot below. The highlighted lines in the screenshot indicate lines that need to be changed for event episodes.
- In the path field, the value should be changed to everything after game.granbluefantasy.jp/ in the URL of the episode in the address bar, NOT the episode URI found through developer tools.
- The value in the id field depends on the URL of the episode:
- scene_evt######_cp#_q#_s## should be the value if it is located in the URL
- (e.g. if the URL is game.granbluefantasy.jp/#archive/story/play_view_event/73410/scene_evt181031_cp0_q1_s10/null/1/1/4/null, the id is scene_evt181031_cp0_q1_s10)
- Otherwise, the id should be the first three numbers in the URL, separated by underscores
- (e.g. if the URL is game.granbluefantasy.jp/#archive/story/play_view_event/73410/73411/null/1/1/4/null, the id is 73410_73411_1)
- The type field value should be changed from fate to event.
- The character_id and name fields should be removed entirely and replaced with the following:
|event=
|chapter=
|chapter_name=
|episode=
|episode_name=
- The event field should contain the event name.
- The chapter field should contain either the chapter number if applicable, op if it is an opening episode, ed if it is an ending episode, or left blank otherwise.
- The chapter_name field should contain the chapter name. Note that this field should be left blank if it is an opening or ending episode.
- The episode field should contain the episode number or left blank if it is a standalone episode.
- The episode_name field should contain the name of the episode if applicable or left blank otherwise.
The output should now be ready to copy.
See Scenario:The Other Side of the Sky - Chapter 1: Remedial Class Delinquent - Episode 1 for an example of a proper event episode output.
Event Episode Page Names
The Expected Page name will not display the correct page name. Instead, a page with the correct name should be manually created.
Story event scene page names follow the following format:
- If the episode is an opening:
- Scenario:Event Name - Opening (e.g. Scenario:Festival of Falling Flame - Opening)
- If the episode is an ending:
- Scenario:Event Name - Ending (e.g. Scenario:Festival of Falling Flame - Ending)
- If the episode is part of a numbered chapter:
- Scenario:Event Name - Chapter #: Chapter Name - Episode # (e.g. Scenario:Festival of Falling Flame - Chapter 1: The Zealous Gambler - Episode 1)
- If the episode is a daily episode:
- Scenario:Event Name - Day # (e.g. Scenario:Auld Lang Syne 2015 - Day 1)
- If the episode is part of a chapter that is not numbered:
- Scenario:Event Name - Chapter Name (e.g. Scenario:What Makes the Sky Blue II: Paradise Lost - Light's Reverie)
- or if there are multiple episodes:
- Scenario:Event Name - Chapter Name - Episode # (e.g. Scenario:A Slice of Summer - Beach House Boogaloo - Episode 2)


