Town Items
New Players: Starting Granblue Fantasy | Creating an Account | Rerolling
Beginner Missions and Draws: Sierokarte's Knickknack Academy | Skyscope | New Skyfarer Step Up Special | Beginner's Draw Set
Wiki Resources: FAQ | Recurring Tasks | Basic Grids | Advanced Grids | Glossary | Guides | Town Items | Optimizing Performance

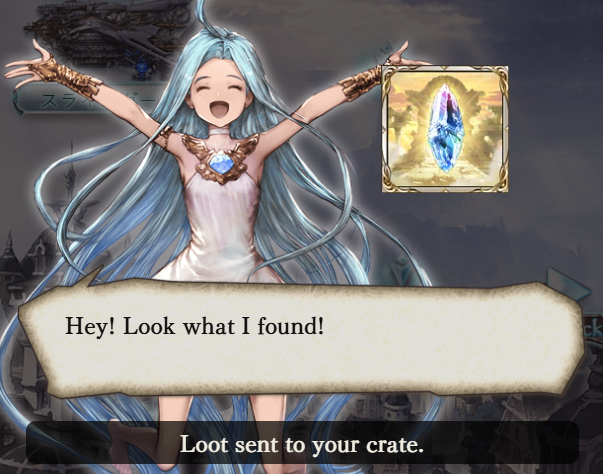
By clicking the Town icon on the right side of the Home Screen, players can find several free items scattered around the current part of the world they're in.
The first time this is done for any area, the sparkles will be golden, and will usually just give some common items. However, after all the golden sparkles are claimed, a secret item can be found via clicking the sparkles in a specific order.
Each island has a different order and a different reward. Examining the sparkles in this order will have a pop-up with 
Total Rewards


- Top Left (Golden Fog Woods)
- Bottom Right (Hermit Village)
- Top Right (Outer Mountain Ridge)
- Bottom Left ((Captain)'s Home)
Reward: 

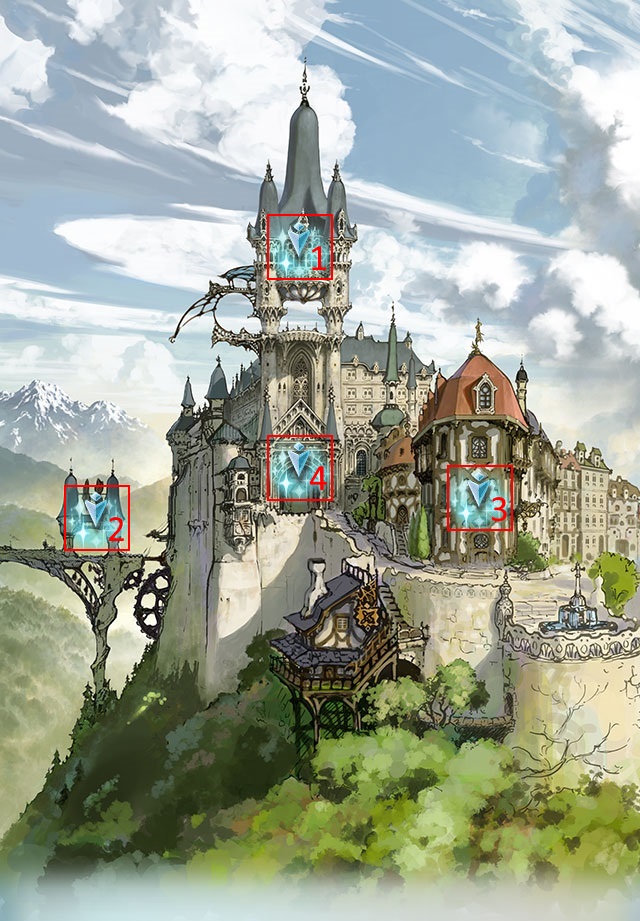
- Top (Ungud Castle)
- Bottom Left (The Jutty)
- Bottom Right (Siero's Knickknack Shack)
- Middle (The Cardinal Temple)
Reward: 
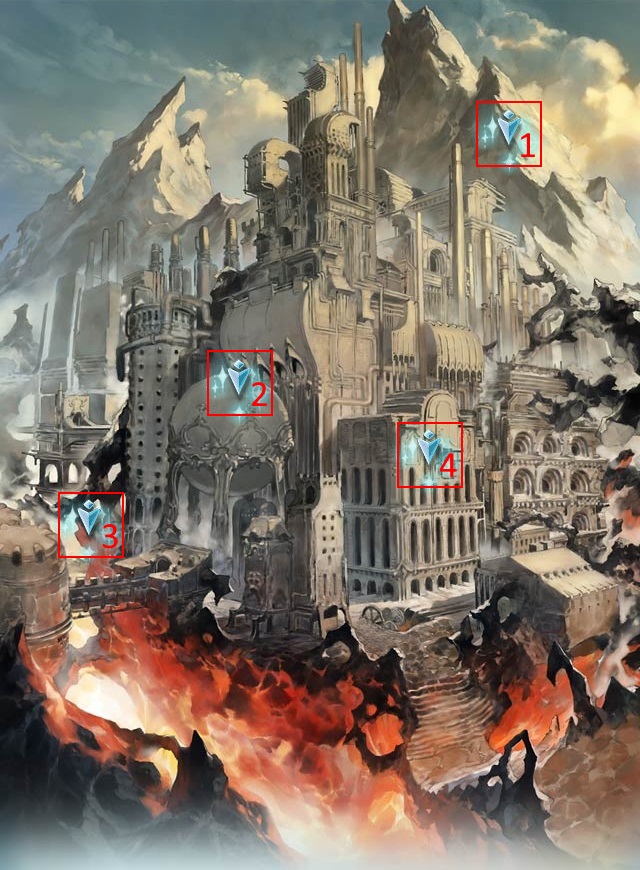
- Top Right (The Arsenal)
- Mid Left (The Plant)
- Bottom Left (River of Lava)
- Bottom Right (Grand Arsenal (Factory))
Reward:
- Bottom Left (Auguste Shop 2)
- Top Right (Mizarea, Aqua City)
- Top Left (Auguste Shop 1)
- Bottom Right (The Bridge of Wishes)
Reward:

- Top Right (The Lumacie People)
- Bottom Right (The Great Tree of Time)
- Top Left (Treehouses)
- Bottom Left (Entrance to the Deep Forest)
Reward:

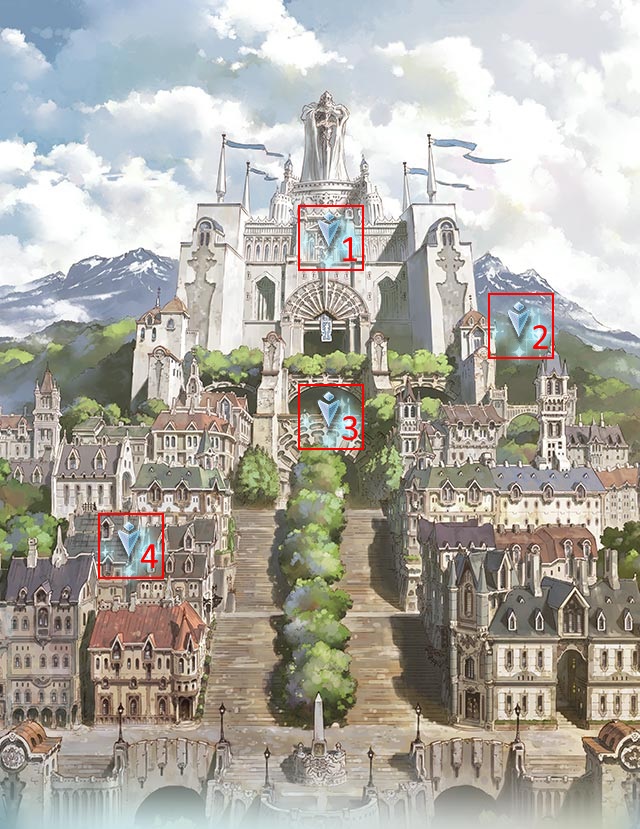
- Middle (Town of Albion)
- Bottom Right (Albion's Greenery)
- Left (Albion Citadel)
- Top (Albion Castle)
Reward:

- Top Right (Villagers)
- Left (Village Office)
- Top Middle (Monster Mansion)
- Bottom (Bridge of the Dead)
Reward:
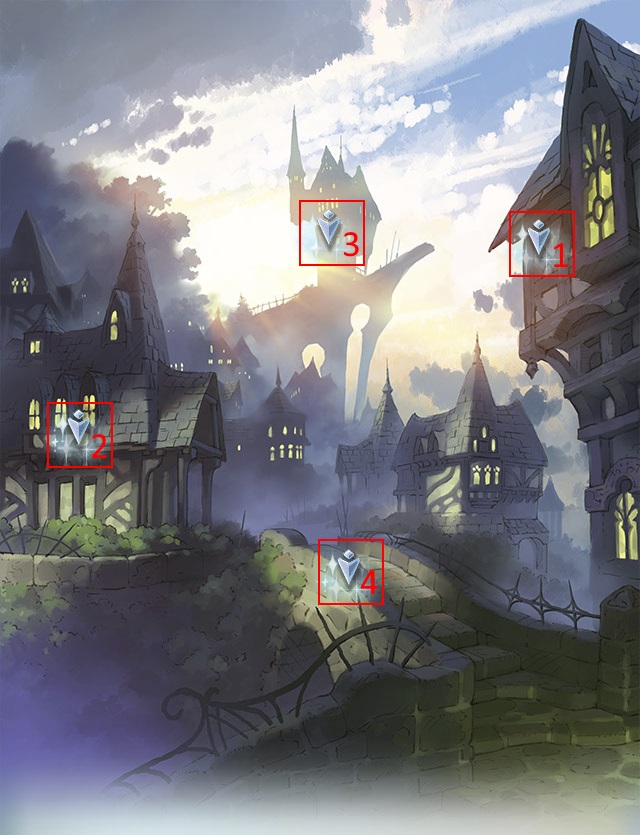
- Bottom Left (Inspection Office)
- Top Right (Cranes)
- Bottom Middle (Airship Manteca)
- Top Middle (Central Docks)
Reward:

There are two versions of the island depending on story progression.
| Battle torn | Pristine |
|---|---|
|
|
Reward:

- Middle (Trees of the Desert)
- Top Right (Palace of Elijah Chelm)
- Bottom (City of Mephorash)
- Top Left (Shem Desert)
Reward:

- Top Right (Erste Empire Battleship)
- Bottom Left (Town of Agastia)
- Bottom (Agastia Fortress)
- Top (Imperial Headquarters)
Reward:

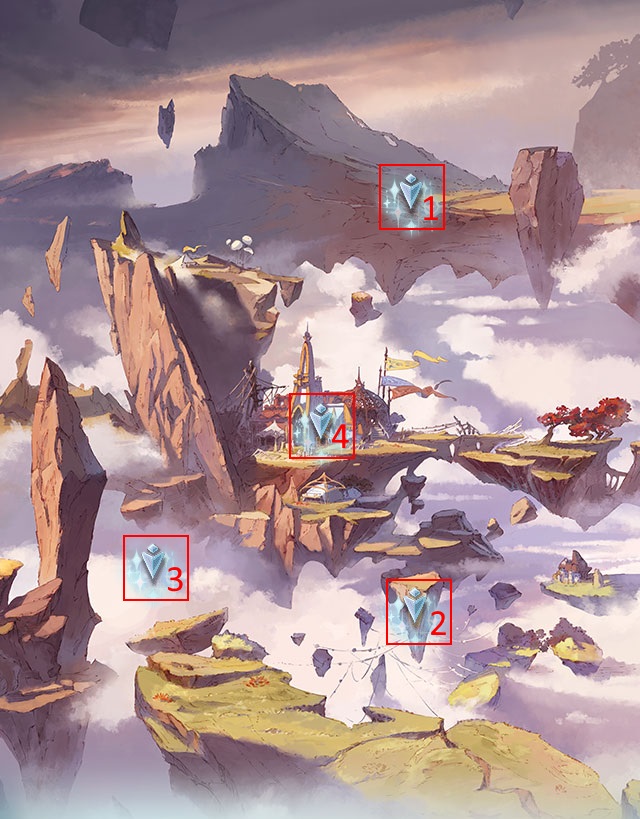
- Top (Vergelands, Dydroit Belt)
- Bottom Right (Boulder Bluffs, Dydroit Belt)
- Bottom Left (Sea of Clouds)
- Middle (Central City, Dydroid Belt)
Reward:
- Bottom Left (The Hidden Village)
- Bottom (Silverwind Stretch Monsters)
- Middle (Eoniho Mountains)
- Top Right (Grim Basin)
Reward:

- Right (Antiquated Townscape)
- Bottom (Fortress Traps)
- Top (Fortress Overlook)
- Middle (Sturren Fort)
Reward:

- Left (Lake Spiegel)
- Top (Mount Groz)
- Bottom (City of Luxurios)
- Middle (Volkshield Palace)
Reward:

- Bottom (Island Mist)
- Middle Right (Bleistift Mountains)
- Top (Temple of Learning)
- Middle Left (Stardrift Sanctuary)
Reward:

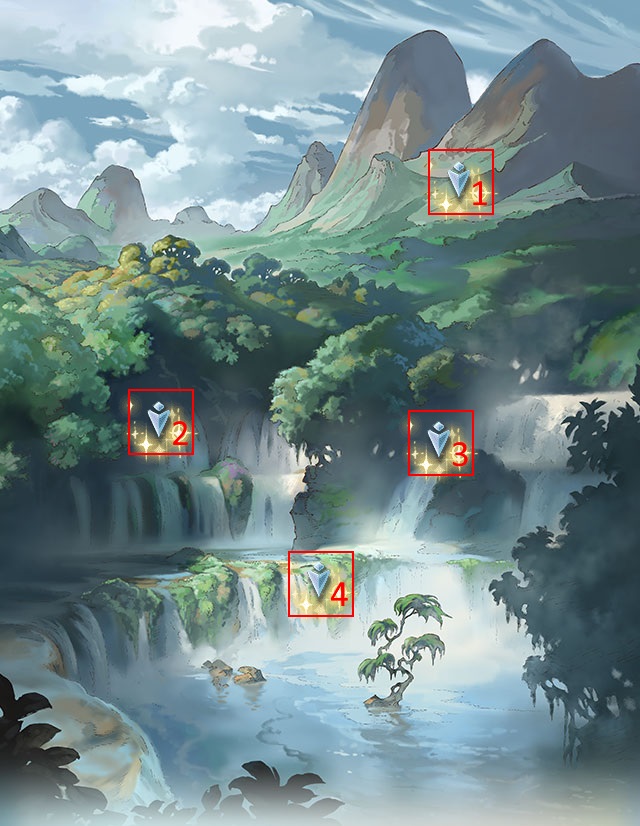
- Top (Grace Grove)
- Middle Left (Blooming Cascade)
- Middle Right (Murmuring Stream)
- Bottom (Saudade Reservoir)
Reward:
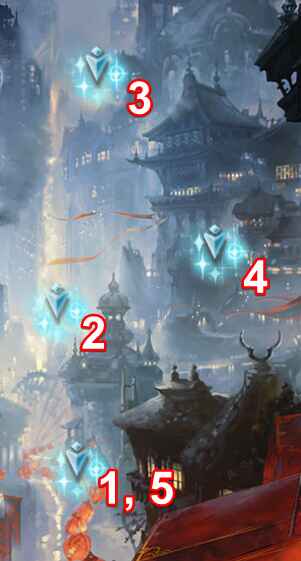
- Bottom (Life in the Lower Wards)
- Middle (Overlapping Buildings)
- Top (Noxious Smog)
- Right (Third Residential Ward)
- Bottom (Life in the Lower Wards)
Reward:
- Bottom left (Remains of the Kingdom)
- Bottom right (Divine Retribution's Scar)
- Middle right (Tower of Hope)
- Top right (Heavenly Radiance)
- Middle right (Tower of Hope)
- Top right (Heavenly Radiance)
Reward:
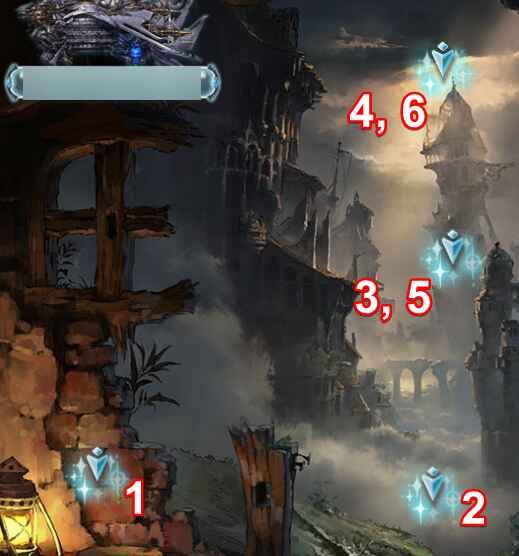
- Top right (The Eruption)
- Bottom (Inhabitants at Odds)
- Middle (Living Atop Ebisu)
- Top (The Edgelands)
- Middle (Living Atop Ebisu)
- Bottom (Inhabitants at Odds)
- Top right (The Eruption)
Reward:
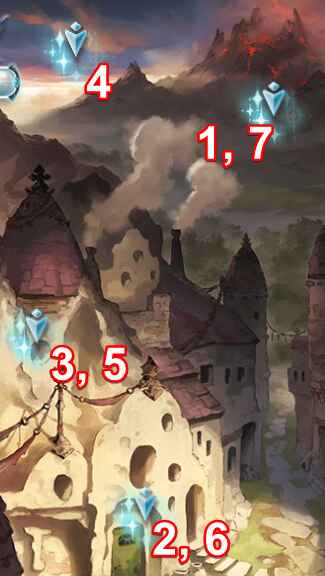
- Bottom (Z13 Residential Ward)
- Top (Classified 003)
- Bottom (Z13 Residential Ward)
- Top (Classified 003)
- Bottom (Z13 Residential Ward)
- Top (Classified 003)
- Bottom (Z13 Residential Ward)
- Right (Z7 Transmission Tower)
- Left (Utopia Z1 Palace)
- Right (Z7 Transmission Tower)
- Left (Utopia Z1 Palace)
- Right (Z7 Transmission Tower)
Reward:
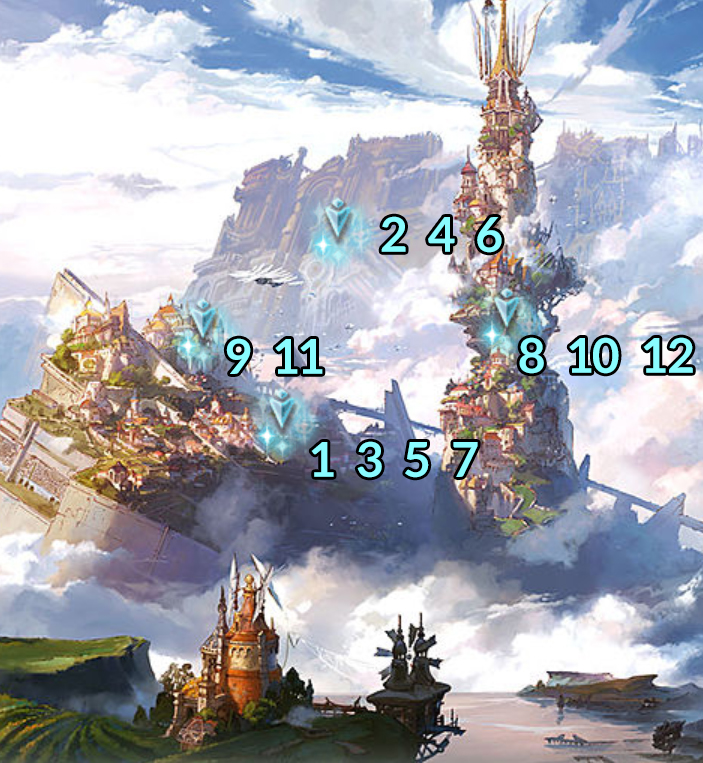
- Bottom (The Quad)
- Middle Right (Institute's Main Gate)
- Middle Left (New Main Building)
- Bottom (The Quad)
- Middle Left (New Main Building)
- Middle Right (Institute's Main Gate)
- Bottom (The Quad)
- Top (Golden Clock)
Reward:
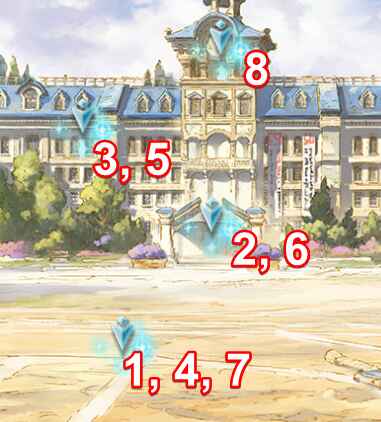
- Bottom (Grand Avenue)
- Middle (Central Theater)
- Left (Observation Deck)
- Right (Sky That Never Sleeps)
- Left (Observation Deck)
- Middle (Central Theater)
- Bottom (Grand Avenue)
- Right (Sky That Never Sleeps)
Reward:
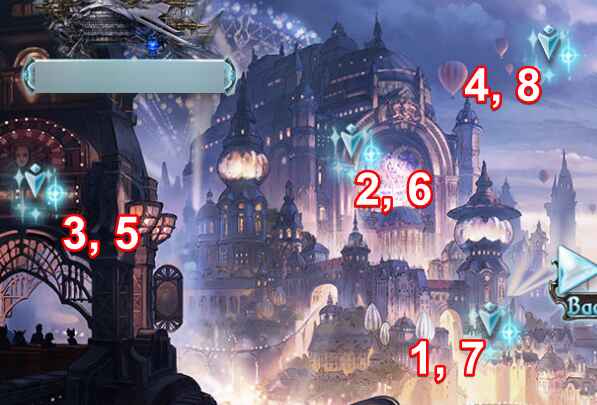
- Left (Duat City Center)
- Bottom Right (Radial Streets)
- Middle Right (Duat Courthouse)
- Bottom Right (Radial Streets)
- Left (Duat City Center)
- Bottom Right (Radial Streets)
- Middle Right (Duat Courthouse)
- Top Right (Statue of Maat's Scales)
Reward:
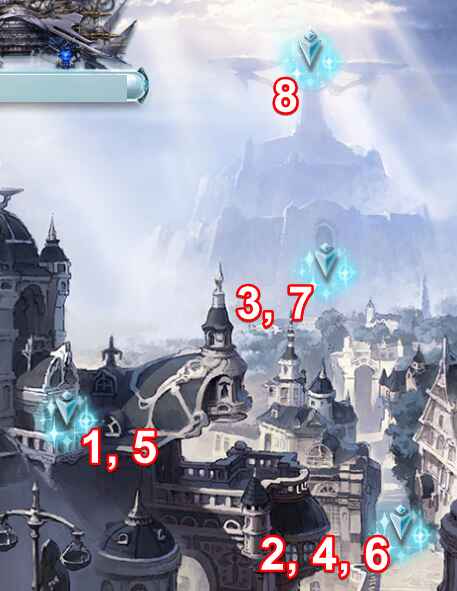
- Bottom Right (Ardley Trail)
- Bottom Left (Farmlands)
- Top Right (Farm Commune)
- Top Left (Viceroy's Office)
- Top Right (Farm Commune)
- Bottom Left (Farmlands)
- Bottom Right (Ardley Trail)
Reward:
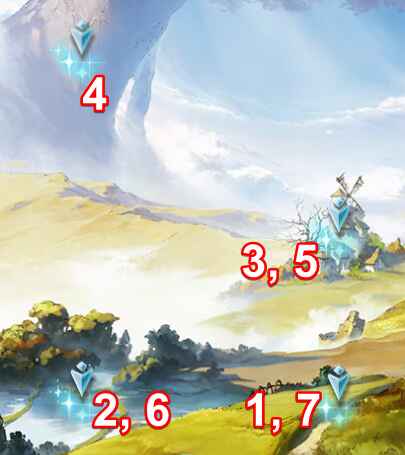
- Bottom (Ruined City Center)
- Top (Central Ward)
- Left (Inpatient Ward)
- Top (Central Ward)
- Left (Inpatient Ward)
- Top (Central Ward)
- Bottom (Ruined City Center)
- Right (Land of Silence)
Reward:

- Bottom right (Sunlit Pond)
- Bottom left (Raspberry Bridge)
- Top left (Great Windmill of Neoseria)
- Top right (Mount Orfed)
- Top left (Great Windmill of Neoseria)
- Bottom left (Raspberry Bridge)
- Bottom right (Sunlit Pond)
Reward: